Good Morning and Happy Thanksgiving! I thought I would share a quick tutorial on making an A2 Waterfall card with you for those that find themselves with some extra time this holiday break:
Materials Used:
- Cricut Cartridges From My Kitchen and A Child's Year
- My Pink Stamper Flowers & Friendship
- Stampin' Up cardstock in Early Espresso, Chocolate Chip, Sage Shadow
- White cardstock from my stash
- Stampin' Up designer series paper Wintergreeen
- Stampin' Up Mellow Moss grosgrain ribbon
- Stampin' Up Soft Subtles eyelets
- Stampin' Up Early Espresso classic ink
- Pop dots
Directions/ Tutorial:
 |
| Start with a 4 1/4" x 11" piece of cardstock. Score at 5 1/2". You may also just use a 4 1/4 x 5 1/2 piece of cardstock as an option and not have the extra insert for messaging. |
 |
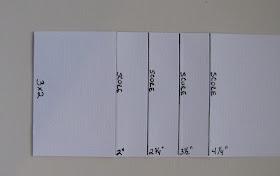
| Cut a 3" x 9" piece of cardstock. Score at 2", 2 3/4", 3 1/2" and 4 1/4" width wise. |
 |
| Add your designer paper cut at 4" x 5 1/4". |
 |
| Add a strip of 1" x 4" cardstock with eyelets, brads, or other type of adhesive. Note: If you use adhesive, JUST use on the immediate sides. However, I would recommend one of the first two methods. |
 |
| Add sticky tape to the center of the smaller strip. |
 |
| Place the 3" x 9" piece of cardstock where desired (I centered it and left a larger margin on the bottom) onto the adhesive strip. The scored section should be on top. |
 |
| Cut 4 2 7/8" x 2 7/8" pieces of cardstock. Cut 4 3" x 3" pieces of cardstock. Embellish the smaller pieces and adhere to the 3" bases. |
 |
| Starting from the bottom, adhere the squares onto the 3" x 9" piece at each score mark. |
 |
| Only use adhesive at the top of the 3" x 3" pieces when adhering. |
 |
| Continue layering the 3" pieces until all four are adhered. The last piece should be at the top of the folded 3"x 9". |
 |
| Add a ribbon or other type of pull to the bottom of the back layer. I also layered a piece of cardstock onto the back, but this is optional. |
 |
| Cut a semi-circle or other shape at the bottom so the card's recipient knows to pull the ribbon. |
 |
| All done! |
 |
| The images will flip (waterfall) as the recipient pulls the ribbon. |
 |
| Add your sentiment to the last back section. |
 |
| I also layered the inside as an option. |
Well, that's it! You can easily change up the sizes as well by changing the size of the four flip pieces. For instance, you can cut the base pieces at 2"x 2", their layers at 1 7/8" x 1 7/8", the small strip at 3/4" x 4" and the larger strip 2" x 9" for a more uniform look and size (All other measurements would stay the same). It's much easier then it looks, so give it a try!
I hope you enjoy your holiday with family friends. I for one, have so much to be thankful for: you for instance!
THANK YOU for being my crafty friends, viewers, and followers!


Love this and so need to try it...I'm pining it to my pinterest so I do not forget!
ReplyDeletehttp://www.coolbeansbylb.blogspot.com/
Happy Thanksgiving Renee! Great card, and great tutorial I'm going to have to try this!!!
ReplyDeleteOh, wow Renee! You make it look so easy! Hope you had a wonderful Thanksgiving. I am going to bookmark this and will try making it one of these days. Thanks for being so generous with sharing your work with us all ;)
ReplyDeletelooking at the past. love this
ReplyDelete