Showing posts with label Imagine - Imagine More Cards. Show all posts
Friday, May 11, 2012
Something Old, Something New
I know you are getting tired, of me using this cow, but it worked for this challenge:
I used the older Imagine carts Imagine More Cards and Kate's Kitchen and used the newer cart Letter Envy to create this 6x6 scrapbook layout.
Sunday, May 6, 2012
Snail Mail
I created this card for a challenge on Pumpkin Spice. We were supposed to use the color green, a square and a die cut. I used the Imagine cartridge Imagine More Cards to cut the image and all it's layers @ 4". I also embossed the pink square with the Cuttlebug folder Swiss Dots. The edges were all inked using Ranger distress inks in the coordinating colors and I topped the card off with some twine and rub on circles. Oh, and the card base cardstock is Certainly Celery. They have a couple more challenges I am going to try to enter. =)
Thursday, May 3, 2012
Moochas gracias
I was inspired to create this card from my scrappin friend Maria. She created a similar card for me and I just loved it! Here is my version:
Materials Used:
Materials Used:
- Imagine cartridge Imagine More cards
- Cricut cartridge Elegant Cake Art
- Stampin' Up! Pool Party seam ribbon
- Swiss Dots Cuttlebug embossing folder
- Mother of pearl button from my stash
Friday, April 13, 2012
Moo-chas Gracias!
Materials Used:
- Imagine cartridges Imagine More Cards and Snapshot: Texture
- Cricut cartridge Letter Envy
- My Pink Stamper Even More Punny-licious
- Kraft and white cardstock
- October Afternoon Farmhouse dsp
- Stampin' Up! brown waffle paper
- Stampin' Up! Early Espresso classic ink
- Bandana ribbon from my stash
- Stampin' Up! Styled Silver hodgepodge hardware
- Stampin' Up! Bold brads
Sunday, April 1, 2012
Scrapbook Layout Kits I Made
Here is my first of three design kits I am making:
Materials Used:
Materials Used:
- Cricut cartridges Country Life and Ribbons and Rosettes
- Imagine cartridge Imagine More Cards
- October Afternoon Farmhouse collection
- Stampin' Up! cardstock Ruby Red
- Bazzil cardstock
- Kraft cardstock
- Stampin' Up! waffle paper in brown
- Stampin' Up! linen thread
- Stampin' Up! Spiral punch
- Misc. ribbon in gray
- Vintage milk bottle cap
- Brown thread
- Ranger distress ink in Antique Linen
- liquid Pearls in Buttercup
I added liquid Pearls to the lettering for more dimension and tied a couple on linen ties on as well. |
I sewed on the ribbon for both the aesthetic look and for durability. |
This is an actual vintage milk bottle cap! I punched two holes to make it into a button. I also sprayed with archival spray to keep photos safe. |
I was even able to make a BONUS 12x12 with one more sheet of cardstock and the leftovers from the 12x24:
Linked up at:

Tuesday, August 2, 2011
Playing in the Cricut Craft Room
I have been playing in the Cricut Craft Room and creating a few things. It's still in beta and has some kinks to work through, but I believe it's going to be an amazing tool once everything is ironed out and is rolled out to the general public.
I made this invitation for my stepdaughter's upcoming bridal shower:
She is having a fall wedding and her colors are Eggplant, Harvest Orange and Brown. I used the Imagine cart Imagine More Cards for the card (pg 14) and patterns from the Imagine cart Mystical Garden to fill it in. The great thing about the Imagine is that you can fill in the card (or any other image) with any pattern from another cartridge or achieve any desired color by just filling in the RGB. How cool is that? I wanted to add some 3-D flowers as well, but ran out of time and had to get them in the mail.
As a side note: DON'T add thick embellishments unless you plan on paying a lot in postage. Even though the card was not very heavy, the knot in the ribbon was too thick. The invitations were posted as small parcels and not as a regular envelope.

Thursday, March 17, 2011
Cricut Circle Weekly Challenge #24: St. Paddy's
Weekly Challenge #24: St. Paddy’s Challenge!
The Challenge: Use rainbow colors OR a monochromatic green color scheme on your project. We also want to see you add a touch of gold somewhere on your project.

The Challenge: Use rainbow colors OR a monochromatic green color scheme on your project. We also want to see you add a touch of gold somewhere on your project.
I used Juliana's Michaels layout from the circle blog weekly example as my inspiration. Actually, I pretty much scraplifted it! =) I hope she doesn't mind....
Once it was completed, I realized it needs more "umph". I will go back and add more cutesy layers to finish it off. I will then repost the "improved" image.
Saturday, February 5, 2011
Cricut Circle Weekly Challenge #19: Whatevah!
Weekly Challenge #19: Whatevah! Challenge
“Whatevah!” is a phrase a lot of parents of teens hear around their house on daily basis. We thought we’d take that phrase to heart for this next challenge. What we’d like you to do is use WHATEVAH shape you would like, but be sure to repeat it three times on your project. Project must also include spray ink and must be newly created for this challenge.

For this challenge, I used the Imagine More Cards cart in conjunction with Forever Young and Ashlyn's Alphabet to create most of the design paper, cardstock and cuts. The exceptions include the flower which was cut from Straight From the Nest and the lace scallop border which was made from a SU punch. I sprayed the flower and the pink ribbon with Tattered Angels glimmer mist in Creme de Chocolat. I also used pink stickles to line the dress and highlight it's ribbon.
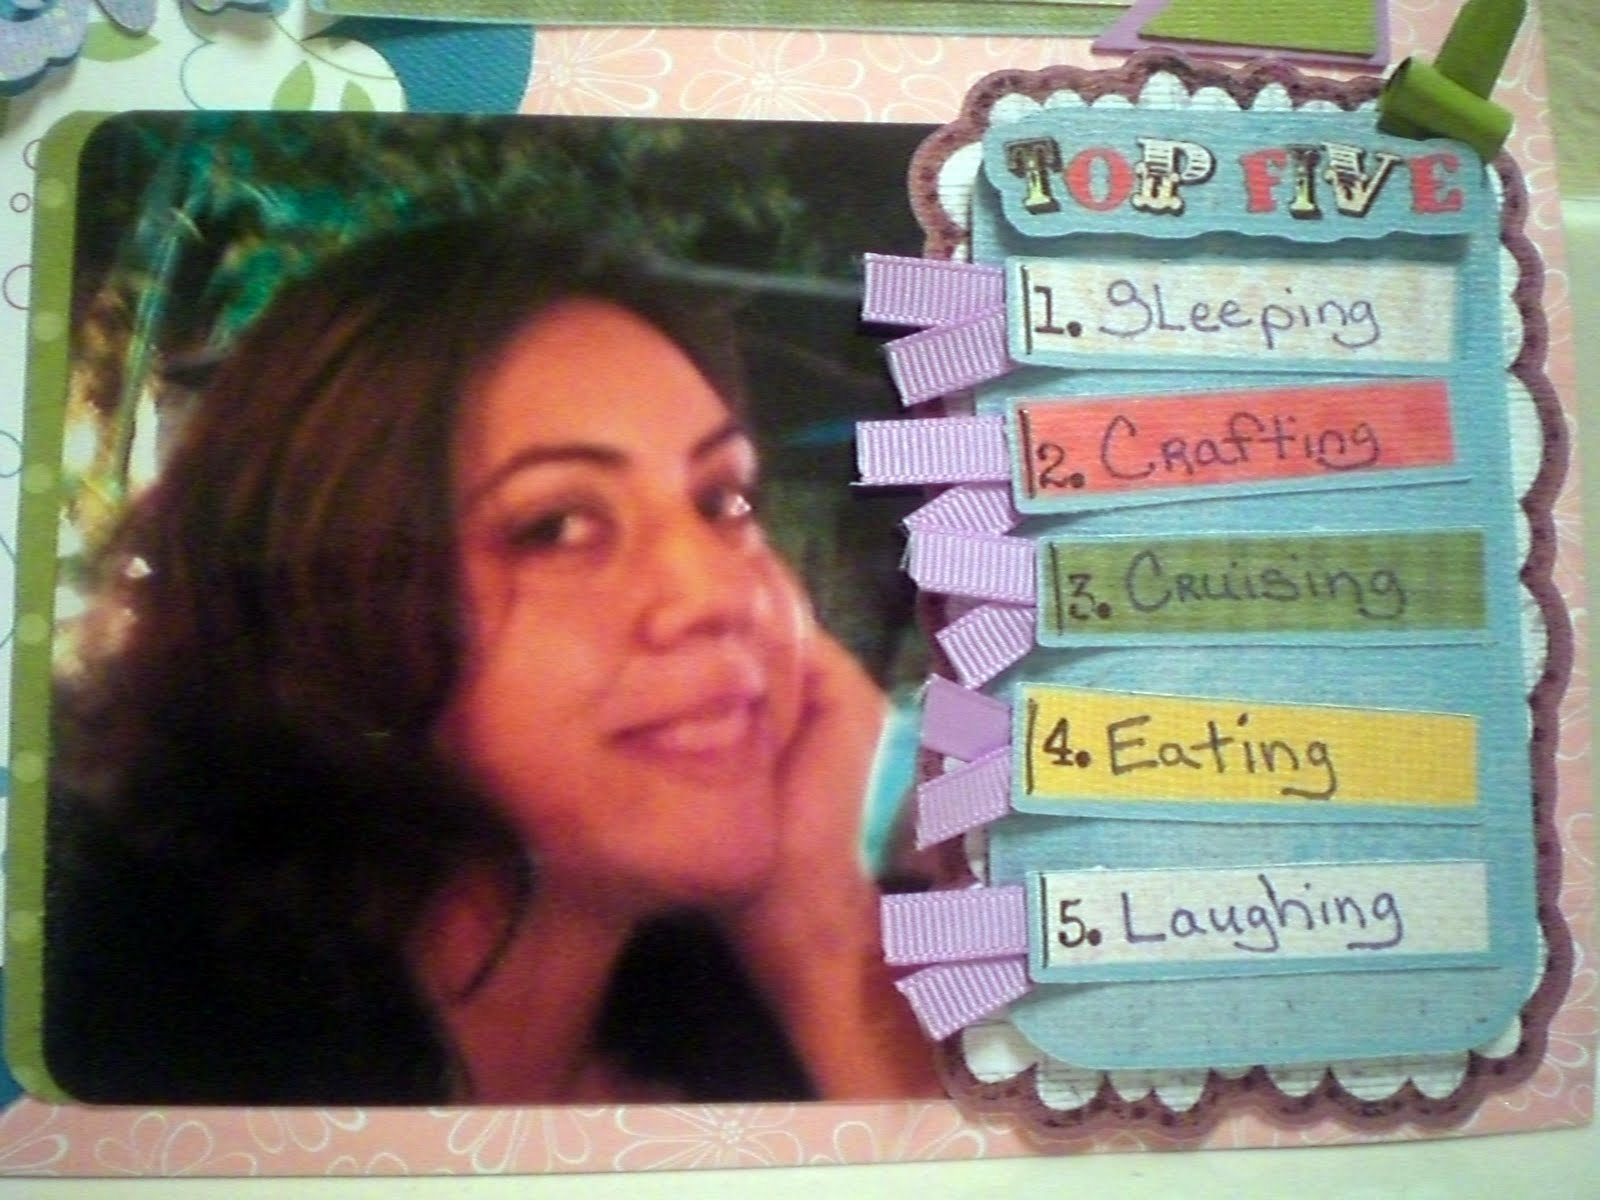
This was my first attempt to flood fill an original Cricut cart image with an Imagine Design. I love the way it works... so simple and you never have to run out of paper in the middle of a project again! I also created the brown cardstock by flood filling one of the emblems. The color printed perfectly. I am really looking forward to the future updates to the Imagine and it's possible capabilities. Have I mentioned how AWESOME it cuts?
“Whatevah!” is a phrase a lot of parents of teens hear around their house on daily basis. We thought we’d take that phrase to heart for this next challenge. What we’d like you to do is use WHATEVAH shape you would like, but be sure to repeat it three times on your project. Project must also include spray ink and must be newly created for this challenge.
This was my first attempt to flood fill an original Cricut cart image with an Imagine Design. I love the way it works... so simple and you never have to run out of paper in the middle of a project again! I also created the brown cardstock by flood filling one of the emblems. The color printed perfectly. I am really looking forward to the future updates to the Imagine and it's possible capabilities. Have I mentioned how AWESOME it cuts?
Thursday, January 27, 2011
Cricut Circle Weekly Challenge #17: B.A.B.Y.
Weekly Challenge #17: B.A.B.Y. Challenge!
At first glance, you may think this challenge is all about babies . . . but look again! We are usually the memory keepers in our households, but how often do you take the opportunity to step out from behind the camera and record something about yourself? This week we challenge you to create a scrapbook layout all about YOU. Your page must include the following:
•(B) = Brads
•(A) = Aqua
•(B) = Butterfly
•(Y) = You as the Subject
Subscribe to:
Posts (Atom)