Showing posts with label Cricut - Sweet Tooth Boxes. Show all posts

Saturday, December 15, 2012

Snow Globe Ornament

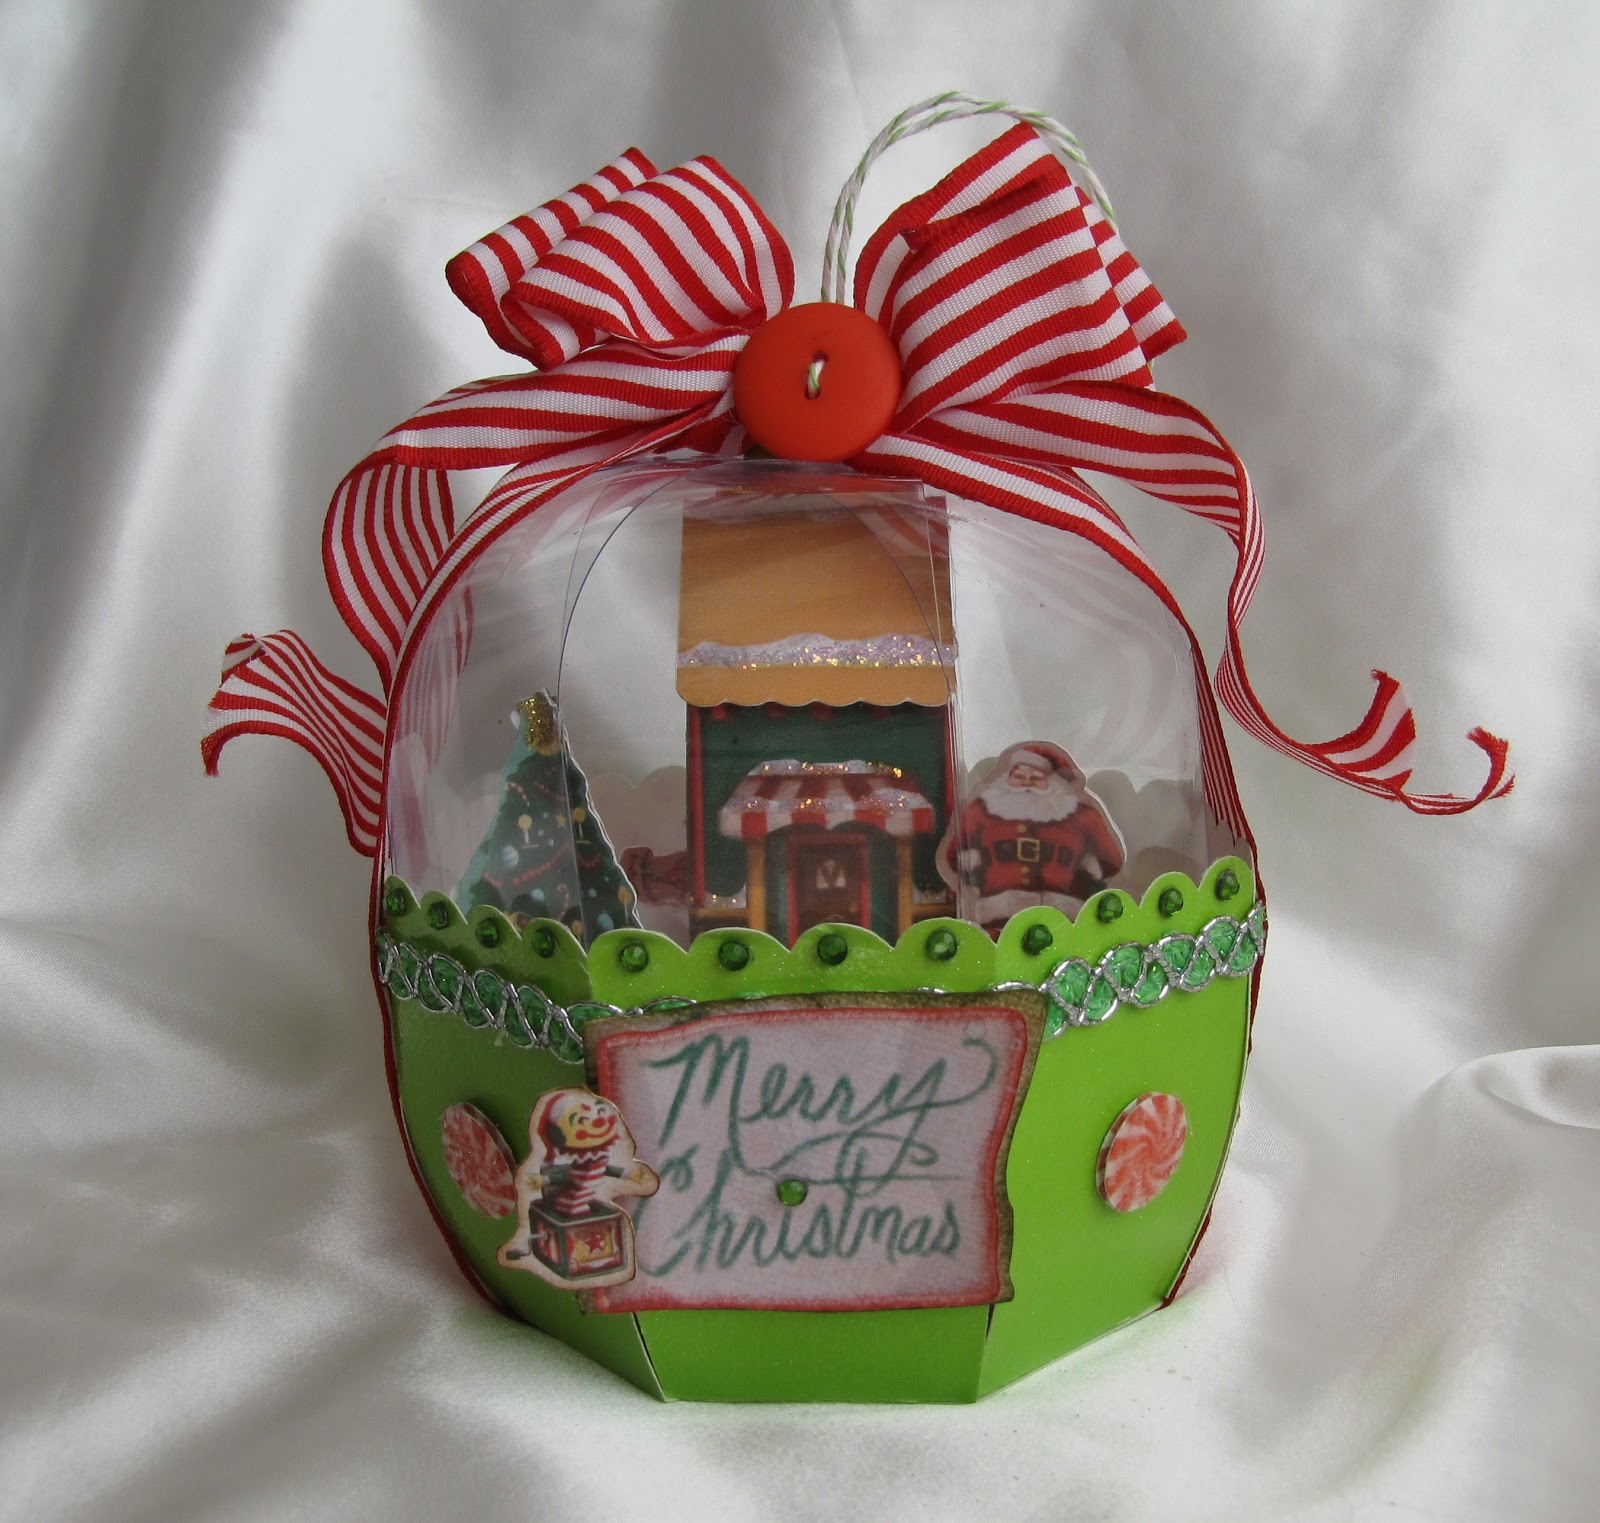
I decided to try my hand again this year at making a Cricut version of a snow globe.  I used many of the same cuts, but changed up the colors and embellishments so I could enter it into a contest that Provo Craft is hosting.

Here's a view of the back.

And a close up of some of the embellishments.  The peppermint candy is from Santa's village as well.  I just printed out one of the patterned papers to get the image and then pop dotted them and added coarse glitter to the top layer.

Inside view from the front.

Inside view from the back.
Materials Used:
  • Cricut Cartridge Sweet Tooth Boxes
  • Imagine Cartridge Santa's Village
  • Impact Clear binding covers
  • DCWV glitter cardstock
  • Ribbon from my stash (striped)
  • Webster's Pages designer trim (green)
  • Green and white twine
  • Stickles in gold and iridescent
  • Green rhinestones
  • Brad
  • Cotton pads
  • Martha Stewart coarse glitter
CCR file: https://www.box.com/s/0l04io4ckivjljuhc746

Gypsy file: https://www.box.com/s/5jmu9qa7e6paq5fosege

Directions:
I used the ice cream cone cut (pg. 15) from Sweet Tooth boxes for my globe. I used the base (pg. 19 cut @ 11.5"), the top (pg. 16 cut @ 11.5") and the inside cupcake holder (pg.20 cut @ 11.5" relative x2). I cut the top using clear binding covers since I couldn't find acrylic or acetate sheets in stock at my local craft store. I found the binding covers at Office Max. Once I assembled the acetate top, I punched a hole on the top and ran a brad through it to keep the top together.  The base was cut from DCWV glitter cardstock. Once I assembled my base I added one of the inside bases (cupcake holders with the inside hole hidden using the hide/contour feature). After I did this, I cut my base a second time, this time hand trimming off the "legs", leaving 1/4" of the cut to be able to glue to the clear acetate and glue my vignette to. Once I assembled the globe, I found that this step was unnecessary to complete the globe. I will call this last step "optional" to use only if you want a second base to adhere your village to. If you don't use this step, you will simply adhere your village onto the first inside layer.

I used the Imagine cartridge Santa's Village to create my scene. I cut the 3D house on page 29 @ 4.0" x 2, Santa page 3 @ 1.5" x2, the sled page 21 @ .5" x2, and the Christmas tree page 24 at 2.0" x3. I flipped the 2nd cut of Santa, one of the trees, and the sled so the images can be seen at either side of the globe. The 3D house only has one cut with two sides, so I simply cut it out twice to complete the 3D effect. To assemble the Christmas tree, I folded each in half and the then adhered them together, starting with a regular image, then the flipped image, and back to a regular image. All the cuts were glued to cotton pads stretched out to make my snow which was taped to my second inside base (cupcake liner). I also hand trimmed down each side leaving about 1/4" on the legs to adhere it to the clear top.

The next step is to glue your clear acetate top to the base. I used hot glue for this step. Since I used the "optional step", I first hot glued my village to the base. Then I hot glued the top to base. 

The last step is to embellish away! I first added rhinestones to each scallop. Next, I added green trim around the base, just under the rhinestone scallops. I then used my striped ribbon tho tie a bow around the entire ornament. I also used green and white twine to tie a coordinating red button to the bow while creating a hanger for the ornament. I added my Merry Christmas saying from page 25 of Santa's Village cut @ 2.0" to the front and added a rhinestone to the "i". I also pop dotted the jack in the box from Santa's Village cut @ 1.0". The last embellishments I added were the peppermint candies I cut from a printed pattern from Santa's village. They were cut at .6" and each had two layers pop dotted together and covered in course glitter for dimension.

That's it! The ornament is ready to adorn the Christmas tree. I would love to see other's vignettes, so if you recreate, please share a link for all to see. =)

Friday, April 6, 2012

My Pink Stamper Birthday Hop

Welcome to our My Pink Stamper Birthday Hop!  You should have arrived here from Missy's blog.  Or you can start at the beginning if you just started the hop.

For my project, I created an explosion box.  I have been wanting to do this since I made one at last year's Stampede.  I used Sweet Tooth Boxes to create my box and lid rather then measuring.  Gotta love shortcuts, right?


Materials Used:
  • Cricut cartridges Art Philosophy, 3 Birds on Parade & Sweet Tooth Boxes
  • My Pink Stamper, Punny-licious stamp set
  • Echo Park Playground cardstock
  • BoBunny ribbon
  • Battery operated tealight candle
  • Cardmaking Christmas frosting
  • Gimme glam jewels
  • Stampin' Up! Crystal Effects
  • White Signo gel pen


Gypsy File:
Cricut Craft Room File:

Your next stop on the hop is with Cristi.  Thank you for hopping along with us and I hope you have a blast celebrating birthdays with all your loved ones this year!

Here is the complete Blog Hop List in case you get lost:

Saturday, January 28, 2012

Love is in the Air! Blog Hop

Welcome to the Love is in the Air blog hop hosted by Paulette from Around the Block with scrapalette! You should have arrived here from Sharon's blog.  If you didn't, you can go to Around the Block with scrapalette to kick off your inspiration and have a chance to win some great blog candy along the way.  Our projects are all about love and Valentine's Day. 
 
For this hop, I created another valentine card/banner (see previous posts for other examples).  The main concept of the valentine is that it is 3D!  


Materials Used:
  • Cricut cartridges Art Philosophy and Sweet Tooth Boxes
  • My Pink Stamper Flowers & Friendship stamp set
  • Cuttlebug Sentimentals embossing folder set
  • Colorbok Flea Market cardstock stack
  • Stampin' Up Old Olive, Riding Hood Red and Baja Breeze cardstock
  • Core'dinations Sugar and Spice cardstock stack
  • Ranger Tim Holtz Vintage Photo Distress Ink
  • Stampin' Up Pewter hodgepodge hardware
  • Stampin' Up Chocolate Chip grosgrain ribbon
  • Cricut cartridge shell acrylic
Here are the files for all three valentine banners I posted this week.  They are color coded in the Craft Room file to designate which mats go with which banner.  It's a great feature!


Cricut Craft Room File:  http://www.box.com/s/bcm1u8myujd8xj7mcc9y
Gypsy File:
  http://www.box.com/s/hpc5ty92z6vk7sb04q3i

Here are the files for all three valentine banners I posted this week. They are color coded in the Craft Room file to designate which mats go with which banner. It's a great feature!

Thank you for joining us for the Love is in the Air! blog hop.  To thank you for visiting, I am giving away a Just Because Cricut cartridge!
All you have to do to qualify to win is leave a comment on this post.  I will use Random.Org to select a winner on Tuesday, January 31.  Please come back and visit to see if you have won.  The winner will have until Friday, February 3  to contact me with mailing information.

Your next stop on the hop is with Tammy.
And here is the entire blog list in case you get "lost in love":

Paulette from http://scrapalette.blogspot.com/
Dana from http://danascraftycorner.blogspot.com/
Beth from http://thunderbirdlindybydesign.blogspot.com/
Sis from http://papercraftscissors.wordpress.com/
Doreen from http://polkadotpaperprincess.blogspot.com/
Cindy from http://www.inlovewithpaper.blogspot.com/
Deb from http://www.queenmommy.com/
Michele from http://www.michelegreen.com/
Carolyn from http://cccscraproom.blogspot.com/
Colleen from http://scrappycol.blogspot.com/
Elizabeth from http://www.217creations.com/
Sukie from http://www.scrappindhilly.blogspot.com/
Sharon from http://designsbysharon.blogspot.com/
Renee from http://icameisawicreated.blogspot.com/   *** here
Tammy from http://www.scrapcavecreations.com/    *** NEXT
Brenda from http://happyscrapper64.blogspot.com/
Amy from http://scrap-pix.blogspot.com/
Jami from http://thepaperfarm.blogspot.com/
Terri from http://scrappinwiththebug.blogspot.com/
Meg from http://peacockpaperie.blogspot.com/

Linked up at:

Friday, January 27, 2012

Be Mine Valentine Banner using Art Philosophy

Here is another boxed valentine I made:


Materials Used:
  • Cricut cartridges Art Philosophy and Sweet Tooth Boxes
  • My Pink Stamper Yummy-licious stamp set
  • Cuttlebug Sentimentals embossing folder set
  • Colorbok Flea Market cardstock stack
  • Stampin' Up Old Olive, Riding Hood Red and Baja Breeze cardstock
  • Core'dinations Sugar and Spice cardstock stack
  • Ranger Tim Holtz Broken China Distress Ink
  • Stampin' Up Pewter hodgepodge hardware
  • BBP Artesian Pool jewels
  • Stampin' Up Chocolate Chip grosgrain ribbon
  • Hand dyed seam ribbon
  • Cricut cartridge shell acrylic

Don't forget to come back tomorrow to join in on the Love is the Air! blog hop.  I will be sharing one more banner/box and sharing the Gypsy and Cricut Craft Room files for all three boxed valentines.  Of course, I will be giving away blog candy as well! I hope you will join us!

Cricut Craft Room File: http://www.box.com/s/bcm1u8myujd8xj7mcc9y


Gypsy File:
http://www.box.com/s/hpc5ty92z6vk7sb04q3i


Wednesday, January 25, 2012

January 2012 My Pink Designer Day ~ Be My Valentine!

Welcome back!  For this month's My Pink Stamper design team assignment, our theme was:

"Be My Valentine! Make something for Valentines Day. It can be a card, scrapbook page, home decor, a treat or mini album....anything! Think fun and unique!"

I decided to make a two part valentine (a "boxed valentine" if you will) for my project:
1.  A box
2.  A banner


Materials Used:
  • Cricut cartridges Art Philosophy and Sweet Tooth Boxes
  • My Pink Stamper Lunchbox Thoughts stamp set
  • Cuttlebug Love is in the Air embossing folder set
  • Colorbok Flea Market cardstock stack
  • Ranger Tim Holtz Worn Lipstick Distress Ink
  • Ranger Distress crackle paint
  • Ranger Buttercup liquid Pearls
  • Stampin' Up Styled Vanilla hodgepodge hardware
  • Stampin' Up So Saffron grosgrain ribbon
  • Cricut cartridge shell acrylic
My idea is that the person receives the sentiment on the outside of the box, just like a regular one dimensional valentine.  But, it's 3D, so the receiver then opens it up to find a matching banner that he/she can put up to display.  The sender would write his/her message on the backs of the banner pieces. 

I created 3 different valentine banners just by using the Art Philosophy cartridge (and Sweet Tooth Boxes for the boxes).  Please come back to visit to see my other boxed valentines later this week. 

Cricut Craft Room File: http://www.box.com/s/bcm1u8myujd8xj7mcc9 y


Gypsy File:
http://www.box.com/s/hpc5ty92z6vk7sb04q3i


Thursday, November 10, 2011

Ball & Chain

For this month's Cricut Circle's Magazine Challenge, we were given a sketch to follow.  This is my interpretation of the sketch, a ball and chain:


And here is the sketch:


The ball is the ice cream cut from Sweet Tooth boxes cut at 11.5" and represents the circle in the sketch.  The chain is cut by hand from the left over grey from the 12x12 cardstock I used.  The rectangle pieces are 3.8" x 1.0" qty = 18.  I also cut 18 patterned rectangles at 3.8" x .5".  The smaller rectangles are adhered to the larger rectangles to represent the layered band in the sketch.  After creating my chain, I connected it to the ball and added the hand cut cuff to the chain, again using the leftover grey cardstock cut at 8.25" x 1.5".  I trimmed the edges in to connect it to the chain.  Next, I cut the lock to represent the heart in the sketch and the key to represent the rectangle.  I pop dotted the heart pieces for dimension and inked the edges.  Last, I cut the sentiment from Tie the Knot and added it to the cuff.  The smaller heart is the leftover heart from the key image. 

I created this treat box to hold a gift card or small present for the newly wed couple. 

Gypsy File:

http://www.box.net/shared/p6h61ykejzgvas7jgrdv

Saturday, November 5, 2011

Winter/Christmas Blog Hop!

Welcome to the Winter/Christmas Themed Blog Hop celebrating our favorite time of the year. This blog hop is hosted by Paulette, from Around the Block with Scrapalette. If you missed the beginning of the hop, please join in at http://scrapalette.blogspot.com/.
My project for this hop is a snow globe!


Materials Used:
  • Cricut Cartridge Sweet Tooth Boxes
  • Imagine Cartridge Santa's Village
  • Impact Clear binding covers
  • Core'dinations cardstock
  • Ribbon form my stash
  • Stickles in gold and iridescent
  • Cotton pads
  • Martha Stewart punch
I used the ice cream cone cut (pg. 15) from Sweet Tooth boxes for my globe. I used the base (pg. 19 cut @ 11.5"), the top (pg. 16 cut @ 11.5") and the inside cupcake holder (pg.20 cut @ 11.5" relative x2). I cut the top using clear binding covers since I couldn't find a acrylic or acetate sheets in stock at my local craft store. I found these sheets at Office Max. The base was cut from Core'dinations cardstock Cosmo Cricut design. I chose this paper because it already was embossed for me. You have to love that! =) Once I assembled my base I added one of the inside cupcake holders. After I did this, I cut my base from the scalloped edge to the cupcake liner at each crease. I then folded and adhered each layer onto the inside liner. I did this to allow for additional globe to be seen.
Next, I used the Imagine cartridge Santa's Village to create my scene. I cut the 3-D house on page 29 @ 4.0" x 2, Santa page 3 @ 1.5" x2, the sled page 21 @ .5" x2, and the Christmas tree page 24 at 2.0" x3. I flipped the 2nd cut of Santa and the sled so the image could be seen at either end of the globe. The 3D house only has one cut with two sides, so I simply cut it out twice to complete the 3D effect. The Christmas tree I cut 3 times, folded each in half and the then adhered them together. All the cuts were glued to cotton pads stretched out to make my snow which was taped to my second cupcake liner. On this liner I used my Gypsy to hide the inner circle so it would not be cut. I also hand trimmed down each side so that it was only 1/4 of an inch.
To finish the treat box, I added Velcro to keep it down so that goodies could still be added to the inside. I covered the seam with a Martha Stewart punched border and completed the globe with the Merry Christmas saying from page 25 of Santa's Village @ 2.0".

To thank you for stopping by and visiting, I have the Season's Greetings 6x6 Echo Park Christmas paper pad to give away.


All you have to do to qualify is leave a comment. I will be using Random.org to choose a winner on Tuesday, November 8.

Thanks again for hopping along with us! Your next stop on the hop is Tammy.
Here is the entire Blog Hop list in case you get lost or are just wondering where you are ;)
1. Paulette at http://scrapalette.blogspot.com/

Tuesday, October 25, 2011

My Pink Stamper Design Team Day!

Hurray!   Today is October's My Pink Stamper Design Team Day - Christmas cards!  This month we were challenged to create a Christmas card with either Winter Treats & Sayings or Biggie Christmas.  I chose Winter Treats & Sayings to create a hand deliverable Christmas card/treat.  I know what you are thinking...I can't just keep it simple, can I?  =)


In my defense, I would like to state that making this card/treat holder is quite simple due to the Imagine. 
Materials used:
  • Imagine Snow Angel cartridge
  • Cricut Sweet Tooth Boxes
  • My Pink Stamper Winter Treats & Sayings
  • Stampin' Up Chocolate Chip ink
  • Ranger distress ink in Forest Moss
  • Hand dyed ribbon
  • Pop up dots
First, I chose a box from Sweet Tooth Boxes (page 61 cut @ 8.0"), a lid (page 62 & 63 cut @ 8.0" relative) and the tag (page 60 cut @ 8.0" relative). There are actually 3 lids to choose from for this particular box.  I chose c, the open scalloped lid.  Next I chose three coordinating patterns from Snow Angel to flood fill the box pieces with (pages 34 & 40).  Once the pieces were printed and cut, I simply assembled them and edged them in the Forest Moss distress ink.   I added a square piece of  acrylic to window on the inside of the box.  Next, I added coordinating paper shred and my treat, covered it with the lid and tied it with hand dyed ribbon in two coordinating colors to hold the tag and keep the box closed.  I stamped my sentiment "May Your Holidays be Sweetened with Love" in Stampin' Up's Chocolate Chip ink.  Lastly, I cut the deer/bird image layers from Snow Angel (page 15) cut @ 2.0", inked them in the Forest Moss, and pop dotted them to the box.
That's it! A "sweet" way to hand deliver your winter wishes to those close by.

Friday, September 9, 2011

My Pinkalicious Blog Hop Friday ~ September 2011

Welcome to September's  My Pinkalicious Blog Hop Friday! 

For this week's project I created an apple treat box.  It's meant to hold a nice juicy apple!  It's a perfect gift for that special teacher or as a healthy alternative to giving sweets.


Materials Used:
  • Sweet Tooth Boxes Cricut cartridge ~  pg. 15: ConeLy1, ConeLy2, ConeLy3 all cut @ 11"
  • April Showers Cricut cartridge ~ worm base and top cut @ 2.5" x 2 (flip the second set for the backside of the worm)
  • My World Cricut cartridge ~ apple stem x 3 (one in brown and 2 in green)
  • My Pink Stamper School Days stamp set.
  • Card stock from my stash
  • Red craft ribbon
  • Stampin' Up 3/16" red gingham ribbon
  • Ranger distress ink in Forest Moss
  • White Signo gel pen
  • Tattered Angels glimmer mist in Creme de Chocolat
  • Smooch spray
I really like the Sweet Tooth Boxes cartridge because if you think "outside of the box", you can come up with a lot of alternate ways to use the cuts.  Thus far, I have made a barn out of the tool box and a pumpkin out of the same cut of this apple (see prior posts).  The sentiment "You're the apple of my eye!" is what inspired me to make this special box.  It's from My Pink Stamper's School Days stamp set and can be purchased here.
In appreciation of you stopping by to visit, I am have some blog candy for you that I thought was image appropriate to my post:

"The Preserves cartridge is filled with lovingly rendered images of a wide assortment of fruits like apples, pears, mangoes, and kumquats. You’ll love the card, label, lid, and tag features that will enable you to make the most of this fruit-themed cartridge".

All you need to do to qualify to win is leave a comment and a way for me to reach you.  Super simple!  I will use Random.org on Tuesday, 09-13-11 to pick a winner and post the results.  I hope to see you back!

Your next stop on the hop is Cristi.

And here is the entire list in case you lose your way:
Renee (RockinRenee)   << --- This is me!